Published
- 8 min read
How To Configure AWS Elastic Beanstalk For Node.js Apps

Introduction
In the evolving world of web development, scalability, flexibility, and security have become non-negotiables. Developers are seeking effective tools that can help them deploy and manage their applications with ease.
This article sheds light on one such tool - AWS Elastic Beanstalk, focusing on its integration with a Node.js server.
The power of Elastic Beanstalk (EB) and Node.js combined provides a potent and scalable solution for deploying applications. In this step-by-step guide, we will dive into the process of using the Elastic Beanstalk Command Line Interface (EB CLI) to deploy a Node.js server application and enable HTTPS for enhanced security.
Installing the Elastic Beanstalk Command Line Interface (EB CLI) on Windows
Before you can interact with AWS Elastic Beanstalk from your command line, you need to install the EB CLI. This requires Python, pip, and the EB CLI itself. Let’s dive into the step-by-step process of installing these on a Windows machine.
Install Python 3.7 and pip
First off, you need to install Python and pip. The Python Software Foundation provides an installer for Windows that includes pip, which is a package manager for Python.
- Download the Python 3.7 Windows x86-64 executable installer from the downloads page of Python.org.
- Run the downloaded installer.
- During installation, ensure that you choose the option Add Python 3.7 to PATH.
- Click on Install Now.
This process installs Python in your user folder and adds its executable directories to your user path.
Install the AWS CLI with pip
Once Python and pip are installed, you can now install the AWS CLI.
- Open a Command Prompt window from the Start menu.
- Verify that Python and pip are installed correctly by running the following commands:
C:\Windows\System32> python --version
Python 3.7.3
C:\Windows\System32> pip --version
pip 9.0.1 from c:\users\myname\appdata\local\programs\python\python37\lib\site-packages (python 3.7)
Install the EB CLI using the pip
Next, you need to install the EB CLI, which can be done using pip. Run the following command:
C:\Windows\System32> pip install awsebcli --upgrade --userModify Your PATH Variable
After installing the EB CLI, you must add its executable path to your PATH environment variable.
The executable path is %USERPROFILE%\AppData\roaming\Python\Python37\scripts, but the location may vary, depending on whether you installed Python for one user or all users.
Here’s how to modify your PATH variable:
- Press the Windows key and enter the environment variables.
- Choose Edit environment variables for your account.
- Select **PATH **and then click Edit.
- Add the executable path to the Variable value field, separated by semicolons.
For exampleC:\item1\path; C:\item2\path - Click OK twice to apply the new settings.
You should then close any running Command Prompt windows and reopen a Command Prompt window. This allows the new PATH variable to take effect.
Verify the EB CLI Installation
Finally, to verify that the EB CLI is installed correctly, run the following command:
C: \Windows\System32 > eb--version
EB CLI 3.14.8(Python 3.7)
If you need to upgrade to the latest version of the EB CLI in the future, simply run the installation command again:
C: \Windows\System32 > pip install awsebcli--upgrade--user
With the EB CLI installed you can now create, configure, and manage Elastic Beanstalk environments directly from your command line.
Deploying Your Application on AWS Elastic Beanstalk via the EB CLI
The process of deploying your Node.js application using AWS Elastic Beanstalk (EB) and the Elastic Beanstalk Command Line Interface (EB CLI) is streamlined and efficient.
This section guides you through initializing your EB environment, setting environment variables, optionally integrating with AWS CodeCommit for version control, and finally deploying your Express app.
Initialize an Elastic Beanstalk for an Express App
Firstly, navigate to your project’s directory in your terminal and initialize your Elastic Beanstalk environment with the command eb init.
Set Environment Variables
After initializing your EB environment, you can set environment variables either via the EB CLI or AWS web dashboard. Note that you should not define the PORT variable as this will be provided by AWS.
- Elastic Beanstalk Dashboard > Configuration of Environment > (Edit) Updates, monitoring, and logging
To set the environment variables via the EB CLI, use the command:
eb setenv foo = bar JDBC_CONNECTION_STRING = hello PARAM4 = PARAM5 =Configure AWS CodeCommit (Optional)
If you would like to reflect your latest changes manually using eb deploy, you can skip this step. Otherwise, you can integrate your project with AWS CodeCommit.
1. To create a new CodeCommit repository, use the following command:
aws codecommit create-repository --repository-name your-repo-name
2. Then, add a remote for the CodeCommit repository to your local repository:
git remote add aws https://git-codecommit.your-region.amazonaws.com/v1/repos/your-repo-name
3. Finally, push your changes to the CodeCommit repository:
git add .
git commit -m "Deploying to Elastic Beanstalk via CodeCommit"
git push aws master
Deploy Your Express App
With your environment set up and your changes pushed to CodeCommit, you’re ready to deploy your Express app using:
eb deployAccess Your Application
To access your newly deployed application in the browser, run the command eb open.
Configure Health Checks
You may want to set up health checks for your application, especially if you have a non-root path. You can do this by updating the target group configuration of your Elastic Beanstalk. To do this:
- Go to the EC2 dashboard
- Select ”Target Groups” under the ”Load Balancing” section
- Switch to the ”Health Checks” tab on the page

Debugging
Debugging is an essential part of the deployment process. Elastic Beanstalk provides access to various logs, which can be found in the ”Logs” tab on your Elastic Beanstalk environment page.
Download the file and check for issues. For instance, if you suspect a service-related problem, you can check ”web.stdout.log” to see if your service started successfully. Any errors would be visible here.
Enabling HTTPS on Your Elastic Beanstalk Application
After deploying your Node.js application to AWS Elastic Beanstalk, one important step to ensure secure communication is enabling HTTPS. Here’s a step-by-step guide on how to accomplish this.
Navigate to Load Balancers
To start with, navigate to the EC2 dashboard on your AWS console. From the left-hand side menu on your EC2 dashboard, select ”Load Balancers“.
Choose Your Load Balancer
On the Load Balancers page, select the specific load balancer that your Elastic Beanstalk service is using.
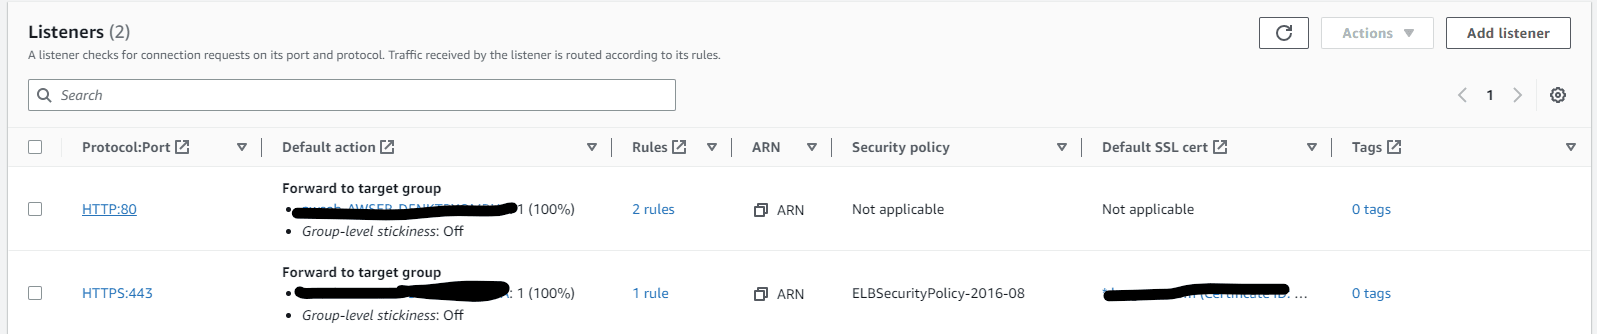
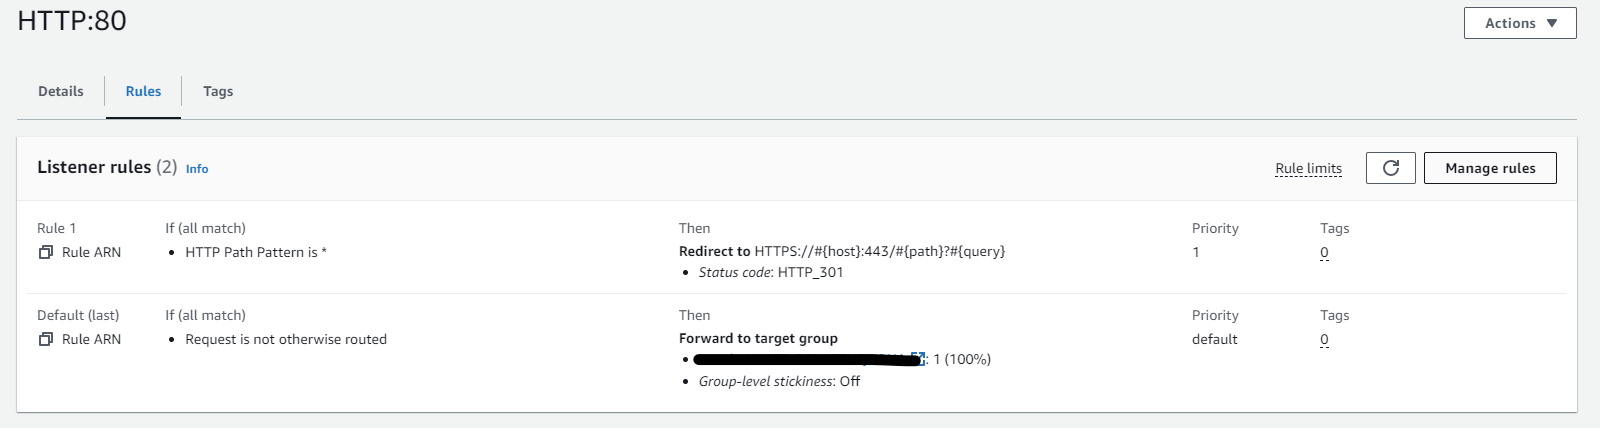
Modify the HTTP Listener Rules
Click on the ”HTTP:80” listener under the ”Listeners” tab. Then switch to the ”Rules” tab and click on ”Manage rules“.
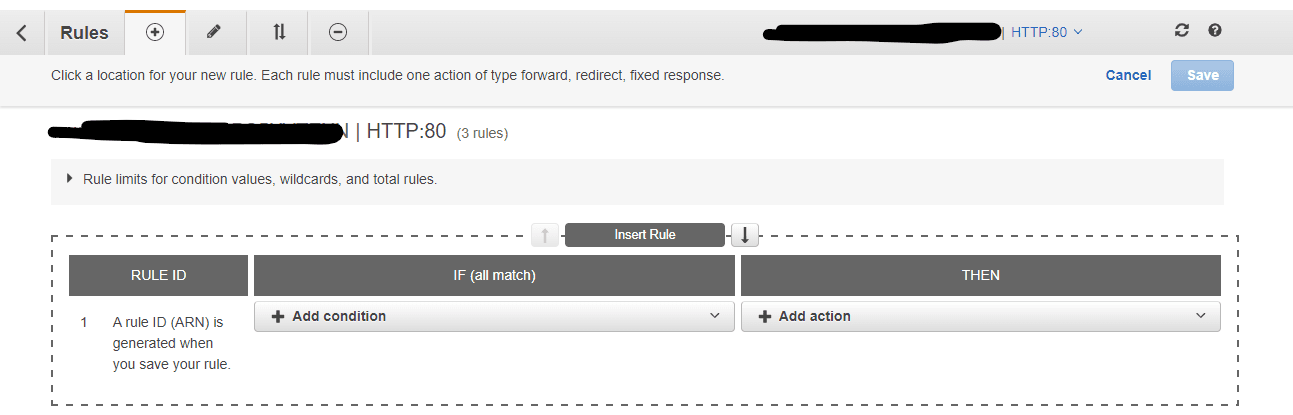
Insert New Rule for Redirect
Click on the ”+” icon at the top and select ”Insert rule”. This opens a dialog to specify conditions for the new rule.
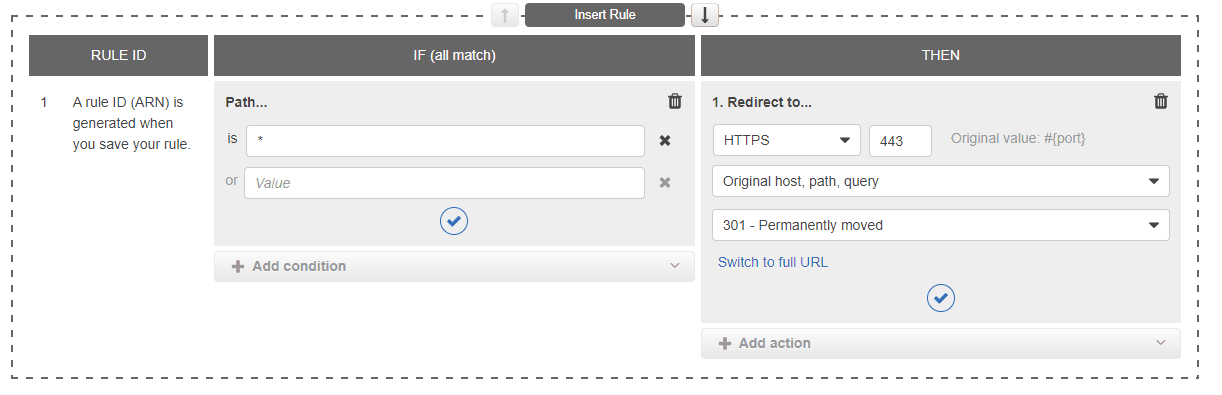
Configure Redirect Rule
Under the ”IF” section, select ”Path” and enter ”*” as the value. This implies that the rule applies to all paths.
Under the ”THEN” section, select ”Redirect to” and input ”443” as the port. This ensures that all HTTP traffic is redirected to HTTPS.
Save the Configuration
Lastly, save the new rule configuration. This completes the setup and your application should now redirect all HTTP calls to HTTPS, ensuring a more secure communication.
After these changes, your application will be accessible from both HTTP and HTTPS. However, all HTTP calls will be automatically redirected to HTTPS. This is an essential step towards protecting sensitive data and ensuring a secure experience for your users.
FAQs
1. How can I deploy my Node.js application using the EB CLI?
You can deploy your Node.js application by first initializing your Elastic Beanstalk environment with eb init, setting up environment variables using eb setenv, and finally deploying your application using eb deploy.
2. How do I enable HTTPS for my application on AWS Elastic Beanstalk?
You can enable HTTPS by configuring your load balancer’s listener rules. By creating a rule that redirects all HTTP traffic (port 80) to HTTPS (port 443), you can ensure secure communication for your application.
3. How do I obtain an SSL/TLS certificate for my custom domain using AWS Certificate Manager?
You can get an SSL/TLS certificate by requesting a certificate in AWS Certificate Manager, adding your domain name, choosing a validation method, and completing the validation process. Once issued, the certificate can be used with other AWS services.
4. What should I do if I encounter issues while deploying my application?
Elastic Beanstalk provides a ”Logs” tab on your environment page where you can access various logs for debugging purposes. Download the file and check it to identify and resolve issues.
5. Can I set environment variables for my application?
Yes, you can set environment variables either via the EB CLI using the command eb setenv, or through the AWS web dashboard.
Conclusion
Harnessing the power of AWS Elastic Beanstalk (EB) coupled with the EB CLI provides a potent infrastructure for deploying your Node.js applications. This guide walked you through the process of setting up your EB environment, deploying your application, setting environment variables, and enabling HTTPS to secure your application. Additionally, by integrating AWS CodeCommit, you gain access to an efficient version control system.
Moreover, this tutorial illustrated the ease of obtaining SSL/TLS certificates through AWS Certificate Manager (ACM) to further secure your custom domain. All these steps together create an environment that is not only secure but also primed for scalability, efficiency, and robust management.